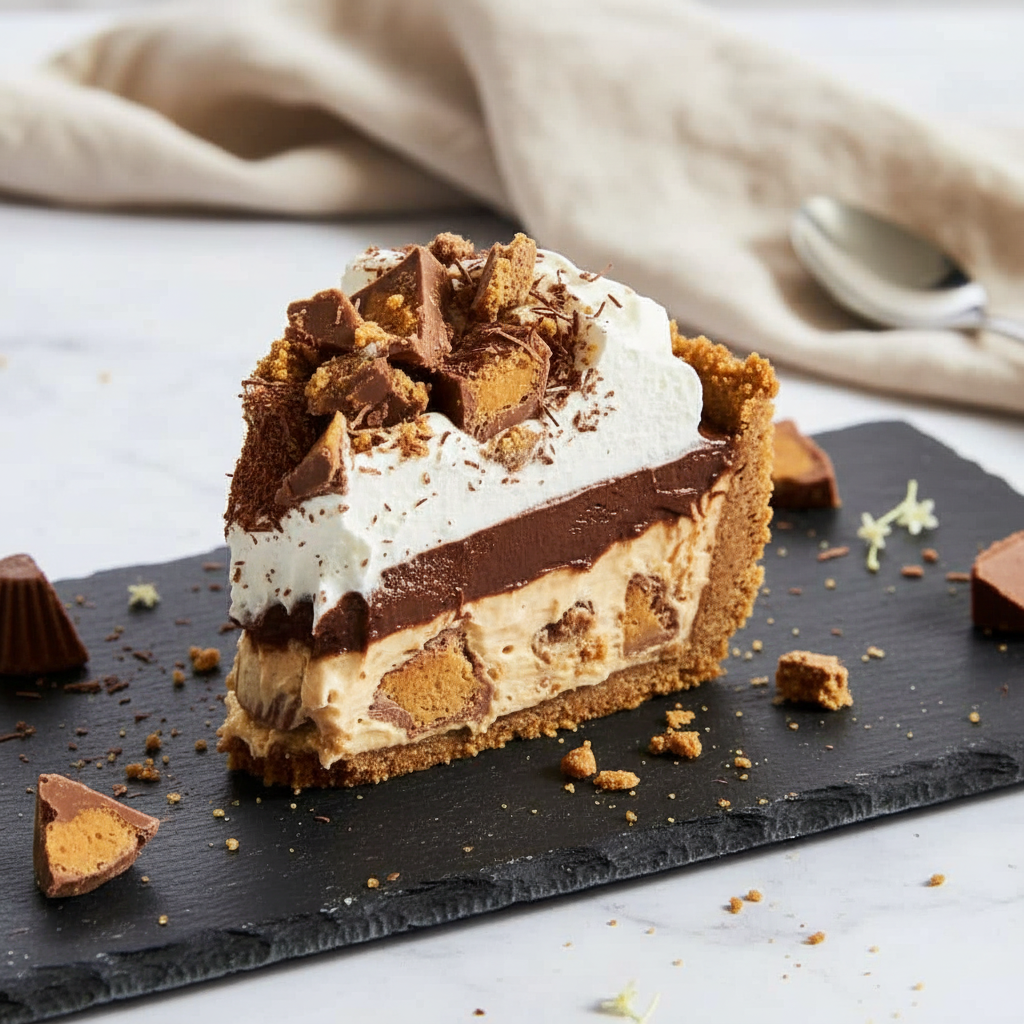
Alright, folks, let’s talk about dessert. You know, that glorious moment after a meal when you just want something sweet, something comforting, and honestly, something that doesn’t take all day to make? Well, get ready, because we’re diving headfirst into the world of the Decadent No-Bake Chocolate Peanut Butter Pie. This isn’t just any pie; it is a creamy, dreamy, chocolate peanut butter fantasy come true, and the best part? No oven needed!
If you are a home food lover, just starting your culinary adventures, or perhaps a budget conscious chef looking for creative, easy to follow recipes, then you are in the right place. This recipe is a fantastic way to impress your taste buds without needing professional equipment or a culinary degree. Trust me, it is a game changer for dessert nights, and it will have everyone asking for seconds.
Jump To:
Why You’ll Love This Recipe
Honestly, what is not to love about a no-bake chocolate peanut butter pie? For starters, it is incredibly simple. We are talking minimal fuss, maximum flavor. It is one of those desserts that comes together in a flash, which is perfect for those busy weeknights or when you need a quick treat for an unexpected gathering. Think about it: no heating up the kitchen, no worrying about soggy crusts, just pure, unadulterated deliciousness.
This pie truly hits all the right notes. You get that crunchy, rich cookie and peanut crust that provides the perfect contrast to the creamy, dreamy peanut butter filling. Then, a silky smooth chocolate pudding layer comes into play, creating a symphony of flavors that is out of this world. It is hearty, satisfying, and screams comfort food, but in a really elegant way. Plus, it is super customizable; you can play around with toppings and garnishes to make it your own.
This particular chocolate chip peanut butter pie, even without actual chocolate chips, features a lovely textural component from chopped peanut butter cups. It is a fantastic recipe for beginners because it is so forgiving. Mess up a little? No big deal! It is all going to taste amazing in the end. It is also quite budget friendly, using readily available ingredients that won’t break the bank. So, if you are looking for a show stopping dessert that is easy, tasty, and universally loved, this is your recipe.
Ingredients
For the Crust
- 32 Chocolate Peanut Butter Pie Oreo Cookies or regular
- 1/2 cup lightly salted peanuts
- 6 Tablespoons unsalted butter melted
For the Peanut Butter Filling
- 8 ounces cream cheese room temperature
- 1 cup creamy peanut butter can substitute with chunky
- 1 cup powdered sugar
- 3 tablespoons milk
- 8 ounces whipped topping softened, divided
- 8 peanut butter cups chopped
For the Chocolate Pudding Layer
- 5 ounces instant chocolate pudding mix
- 2 cups cold milk
Optional Garnish
- mini peanut butter cups
- chocolate sauce
Step-By-Step Instructions
Step 1: Prepare the Crust
First things first, let us get that delicious crust going. Grab your food processor and toss in the Chocolate Peanut Butter Pie Oreo cookies and the lightly salted peanuts. Give it a good whirl until you have fine, uniform crumbs. Next, pour in the melted unsalted butter and pulse again until all those crumbs are beautifully coated. You want it to look a bit like wet sand. Now, press this mixture firmly into an 8 to 10 inch springform pan or a regular pie dish. Make sure the crust goes all the way up the sides. Pop it into the fridge to chill while you work on the fillings. This helps it set up nicely.
Step 2: Make the Peanut Butter Filling
Time for the star of the show: the peanut butter filling! In a large mixing bowl, combine your room temperature cream cheese, creamy peanut butter, powdered sugar, and milk. Blend these ingredients with an electric mixer until everything is wonderfully smooth and creamy. No lumps, please! Now, gently fold in 8 ounces of the softened whipped topping. We are going for light and airy here, so mix until just combined. Finally, stir in the chopped peanut butter cups. Oh, mama, this part is heavenly!
Step 3: Whip Up the Chocolate Pudding
In a separate mixing bowl, get ready for the chocolate layer. Pour in the instant chocolate pudding mix and the cold milk. Give it a good beat, either with a whisk or an electric mixer, for about two to three minutes. You will see it thicken up beautifully right before your eyes. Keep beating until it is nice and thick, just like you would expect pudding to be.
Step 4: Assemble and Chill
Now for the grand assembly! Take your chilled crust out of the fridge. Carefully spread the luscious peanut butter filling evenly over the crust. Next, spoon the thickened chocolate pudding over the peanut butter layer, spreading it out smoothly. Top it all off with the remaining whipped topping. You can make pretty swirls with a spoon or a small offset spatula. For an extra flourish, sprinkle on some mini peanut butter cups and drizzle with chocolate sauce, if you are feeling fancy. Pop the whole thing back into the fridge and let it chill for at least four hours, or ideally, overnight. This is crucial for it to set up and become a proper frozen peanut butter pie like delight!
How To Store Leftovers
So, you have got some willpower and managed to have leftovers? Good for you! Storing this Pb Pie No Bake is pretty straightforward. Just make sure it is covered tightly with plastic wrap or aluminum foil. You can keep it in the refrigerator for up to three to four days. If you want to keep it longer, say up to a month, you can actually freeze slices individually. Wrap each slice well in plastic wrap, then place them in an airtight container. When you are ready for another slice, simply thaw it in the fridge for a few hours or on the counter for about 30 minutes. It tastes just as good, maybe even better, when it is slightly chilled!
Tips
Here are a few pointers to make your Decadent No-Bake Chocolate Peanut Butter Pie experience even smoother. First, make sure your cream cheese is at room temperature. This is a small detail that makes a big difference in getting that perfectly smooth, lump free filling. Trust me, nobody wants lumpy cream cheese in their pie.
When it comes to the peanut butter, creamy works best for that silky texture, but if you are a fan of a little crunch, go ahead and use chunky. It adds a nice textural element. Also, do not skimp on the chilling time. I know it is hard to wait, but that minimum of four hours really helps the pie set up beautifully. If you try to cut it too soon, it might be a bit too soft.
For a fancier presentation, consider piping the whipped topping on top instead of just spreading it. You can use a piping bag with a star tip for a beautiful swirl effect. And if you are really looking to elevate things, a sprinkle of flaky sea salt on top can really bring out the chocolate and peanut butter flavors. It is a little trick that chefs use, and it totally works here.
Conclusion
Well, there you have it, folks! A truly simple, yet incredibly satisfying recipe for a Decadent No-Bake Chocolate Peanut Butter Pie. Whether you are whipping it up for a special occasion or just because you fancy a sweet treat, this pie is sure to hit the spot. It is proof that you do not need to be a professional baker or spend hours in the kitchen to create something absolutely delicious and visually appealing. So, go on, give this no bake chocolate peanut butter pie a try. Your taste buds will thank you, and your friends and family will be raving about it. Happy baking… or should I say, happy no baking!
FAQ
Can I Use Different Cookies for the Crust?
Absolutely! While the Chocolate Peanut Butter Pie Oreos really amp up the flavor, you can certainly use regular Oreos or even graham crackers. Just make sure to adjust the amount of butter slightly if your base seems too dry or too wet.
Can I Make This Gluten Free?
Yes, you can! Just swap out the Oreo cookies for your favorite gluten free chocolate sandwich cookies. All the other ingredients in this no bake chocolate peanut butter pie recipe are typically gluten free, but always double check your product labels to be sure.
How Long Does This Pie Need to Chill?
For the best results, your pie should chill for at least four hours. Overnight is even better, as it allows all the layers to firm up nicely and the flavors to meld together beautifully. This makes for a much cleaner slice!
Can I Freeze This Pie?
Yes, you can! This pie freezes wonderfully. Once completely set, you can cover it tightly and freeze for up to one month. Just let it thaw in the refrigerator for a few hours before serving, or enjoy it as a refreshing frozen peanut butter pie treat straight from the freezer.
What if I Do Not Have a Food Processor?
No food processor? No problem! You can put the cookies and peanuts in a large Ziploc bag and crush them using a rolling pin or the bottom of a heavy glass. It takes a bit more elbow grease, but it gets the job done just fine!
Decadent No-Bake Chocolate Peanut Butter Pie
This decadent no-bake chocolate peanut butter pie is a creamy, dreamy dessert fantasy. Featuring a crunchy cookie crust, a rich peanut butter filling, and a smooth chocolate pudding layer, it’s an easy-to-make treat that requires no oven time!
Ingredients
Instructions
- Combine Oreo cookies and peanuts in a food processor and pulse into fine crumbs. Mix with melted butter. Press the mixture firmly into an 8-10 inch pie dish, covering the bottom and sides. Chill while you prepare the filling.
- In a large bowl, use an electric mixer to beat the room temperature cream cheese, peanut butter, powdered sugar, and milk until smooth and creamy.
- Gently fold in half of the whipped topping and all of the chopped peanut butter cups. Spread this peanut butter filling evenly over the chilled crust.
- In a separate bowl, whisk the instant chocolate pudding mix with the cold milk for 2-3 minutes until it thickens.
- Spread the thickened chocolate pudding smoothly over the peanut butter layer.
- Top the pie with the remaining whipped topping. Garnish with mini peanut butter cups and a drizzle of chocolate sauce if desired.
- Refrigerate the pie for at least 4 hours, or overnight, to allow it to set completely before slicing and serving.
Notes
Ensure your cream cheese is at room temperature to achieve a perfectly smooth, lump-free filling.
For the best texture, don’t cut the chilling time short. A minimum of four hours is crucial for the pie to set properly for clean slicing.
For a fancier presentation, use a piping bag with a star tip to apply the final layer of whipped topping.
Nutrition
Calories
Sugar
Fat
Carbs