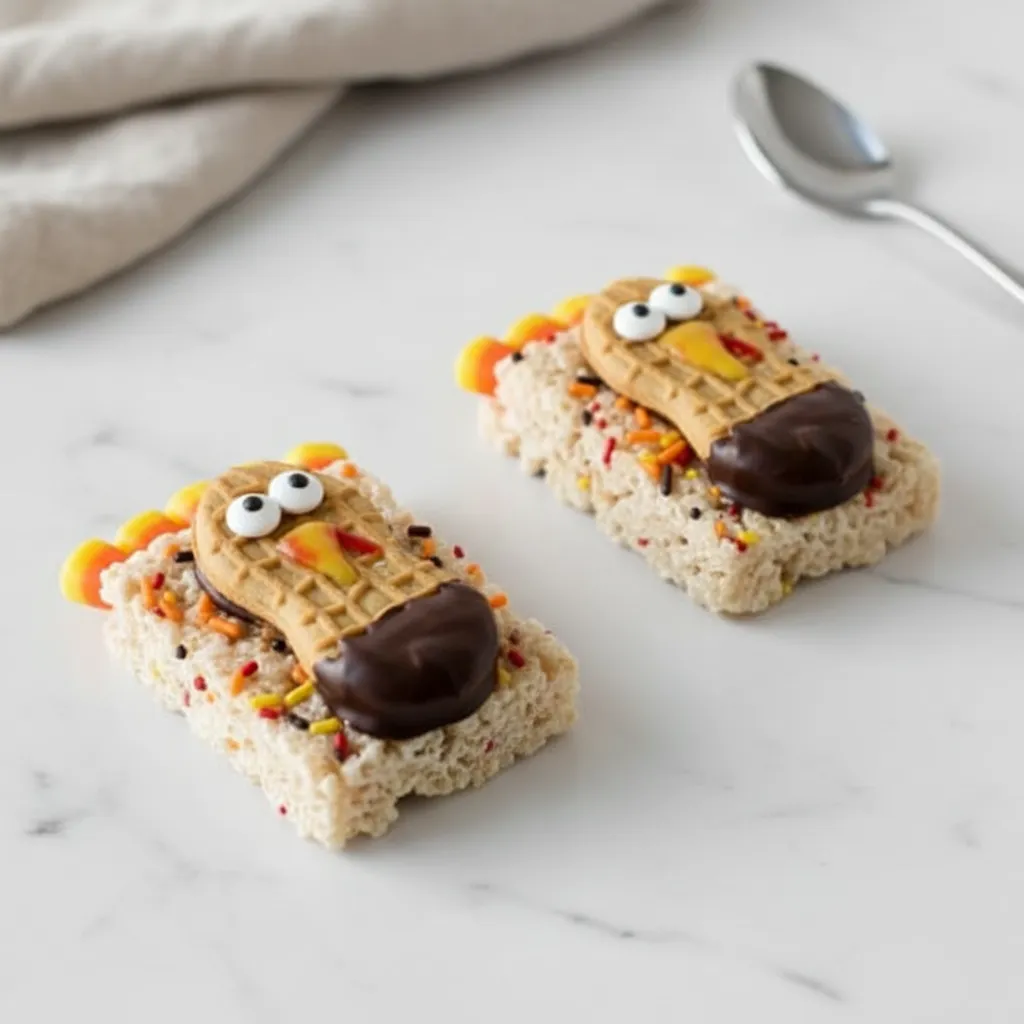
When Thanksgiving rolls around, the main event is always the big turkey dinner. But let’s be honest, sometimes the most memorable moments happen away from the formal dining table, especially for the little ones. That’s where these adorable and Cute Turkey Treats come in! They are the perfect Thanksgiving Snacks For Kids—simple to make, fun to decorate, and absolutely delicious. It’s a no-bake activity that gets everyone in the holiday spirit.
This recipe transforms classic Rice Krispie treats, Nutter Butter cookies, and a few sweet decorations into the most charming little turkeys you’ve ever seen. They’re a fantastic way to keep kids busy and excited while you’re managing the big meal. Plus, who can resist a treat that smiles back at you? Get ready to create some sweet memories and even sweeter snacks that will be the talk of the kids’ table.
Jump To:
Why You’ll Love This Recipe
Honestly, what’s not to love? These little guys are the total package when it comes to holiday fun. First off, they are incredibly easy to assemble. There’s no complicated baking or cooking required, just a little melting and sticking things together. This makes them the perfect project for little helpers who are eager to get their hands messy in the kitchen. It’s a wonderful way to introduce them to the joys of creating food.
Beyond the simplicity, these Turkey Treats are just so visually appealing. They add a huge dose of fun and whimsy to your Thanksgiving spread. Imagine a platter of these next to the pies—they’ll disappear in a flash! They’re also wonderfully customizable. You can swap out sprinkles, use different candies for the feathers, or even let each child design their turkey’s unique personality. It’s more than just a snack; it’s an activity that brings everyone together for a little creative fun before the feast begins. This is one of those Thanksgiving Treats For Kids that parents will love just as much.
Ingredients
Here’s what you’ll need to assemble your flock of delicious turkeys. The list is simple, and you can find most of these items at any grocery store, especially around the holidays.
- 1 batch of prepared Rice Krispie Treats, cut into rectangles
- 1/4 cup Fall-themed sprinkles (harvest colors work best!)
- 1 package Nutter Butter cookies
- 1/2 cup semi-sweet chocolate chips
- 1/2 tsp coconut oil (this is optional, but it helps make the chocolate smooth)
- 1 small tube of frosting (any kind works, it’s just for glue!)
- 1 package of candy eyes
- Decorating gel in orange or yellow, and red
- 1 bag of Candy Corn
Step-By-Step Instructions
Step 1: Prepare Your Rice Krispie Treat Base
First things first, you need the foundation for your turkeys. Begin by making a batch of classic marshmallow treats. If you’re short on time, store-bought Rice Krispie Treat sheets work just fine! To make them from scratch, melt 1/4 cup of butter and a 10-ounce package of large marshmallows together in a pot over low heat. Once it’s all melted and gooey, stir in 6 cups of rice cereal until everything is coated. Now for the festive part—mix in your fall sprinkles! Press the mixture firmly into a greased pan, add a few more sprinkles on top for good measure, and let it cool completely before cutting it into even rectangles.
Step 2: Melt the Chocolate
Next up is the chocolate! This will act as the “glue” to hold the turkey body to the base. In a small, microwave-safe bowl, combine the chocolate chips and the optional coconut oil. The oil helps the chocolate melt into a silky-smooth consistency that’s perfect for dipping. Microwave in 30-second bursts, stirring in between each one, until it’s completely melted and glossy. Be careful not to overheat it, or the chocolate can become grainy.
Step 3: Assemble the Turkey Bodies
Now the real fun begins! Take a Nutter Butter cookie and dip the bottom third of it into your melted chocolate. Immediately place the chocolate-dipped cookie onto one of your Rice Krispie treat rectangles, positioning it slightly off-center to leave room for the tail feathers. The chocolate will harden and secure the cookie in place. To give it extra hold, you can spread a tiny bit of frosting on the top of the cookie (the part without chocolate) before pressing it onto the treat bar.
Step 4: Give Your Turkeys Some Personality
A turkey isn’t a turkey without a face! Use a small dab of frosting as glue to stick two candy eyes onto the top half of each Nutter Butter cookie. Then, grab your decorating gel. Use the orange or yellow gel to pipe a small triangle for a beak right below the eyes. With the red gel, add a little squiggly line next to the beak for the waddle. It’s these little details that really bring your Cute Turkey Treats to life!
Step 5: Add the Tail Feathers
The final touch is the colorful tail. Dip the wide, white end of a few pieces of candy corn into a bit of frosting. Then, press them firmly into the top of the Rice Krispie treat, fanning them out behind the Nutter Butter cookie to create a beautiful, edible tail. You can use three to five pieces of candy corn per turkey, depending on how full you want the tail to look.
Step 6: Let Them Set
Your flock is almost ready! To help the chocolate and frosting set quickly and firmly, place the finished treats on a baking sheet and pop them into the refrigerator or freezer for about 5-10 minutes. This ensures they won’t fall apart when you move them to a serving platter. Once they’re set, they’re ready to be devoured!


How To Store Leftovers
If you happen to have any of these adorable treats left over (which is highly unlikely!), storing them is a breeze. Simply place them in a single layer in an airtight container. If you need to stack them, place a sheet of wax paper or parchment paper between the layers to prevent them from sticking together. They can be stored at room temperature for up to three days. I wouldn’t recommend refrigerating them for long, as it can make the Rice Krispie treats hard. They are definitely best enjoyed fresh!
Conclusion
And there you have it—the most charming and Cute Turkey Treats: Fun Thanksgiving Snacks for Little Ones you could ask for. This recipe is more than just a way to make a sweet snack; it’s a fantastic opportunity to create lasting holiday memories with your family. Watching kids’ faces light up as they decorate their own little turkey is what the season is all about. This simple, no-bake project is the perfect addition to your holiday traditions, offering a fun and delicious way to celebrate all the things we’re thankful for. Happy Thanksgiving!
FAQ
Can I Make These Treats Ahead of Time?
Yes, you can! You can assemble these turkey treats a day in advance. Just be sure to store them in an airtight container at room temperature to keep the Rice Krispie base soft and chewy. They are at their absolute best when served within 24 hours.
What Are Some Fun Variations for the Tail Feathers?
If candy corn isn’t your thing, no problem! You can get creative with the tail feathers. Try using fruit-flavored gummy slices, colorful wafer cookies cut into feather shapes, or even pretzels dipped in colored chocolate. It’s a great way to customize the look and flavor of your Thanksgiving Food For Kids.
How Can I Make This Recipe Gluten-Free?
It’s quite easy to adapt this recipe to be gluten-free. Simply use a gluten-free crisped rice cereal to make your base. Most major brands offer a gluten-free version. Nutter Butter cookies contain wheat, so you’ll need to substitute them with a gluten-free peanut butter sandwich cookie. Always double-check that your other ingredients, like chocolate chips and sprinkles, are certified gluten-free as well.
My Chocolate Seized Up! What Did I Do Wrong?
Chocolate can be a bit finicky! It usually seizes, or becomes thick and grainy, if it gets too hot or if a tiny drop of water gets into it. To prevent this, always melt your chocolate slowly in the microwave on low power and stir frequently. Make sure your bowl and utensils are completely dry. If it does seize, you can sometimes save it by stirring in a teaspoon of vegetable oil or melted shortening until it becomes smooth again.