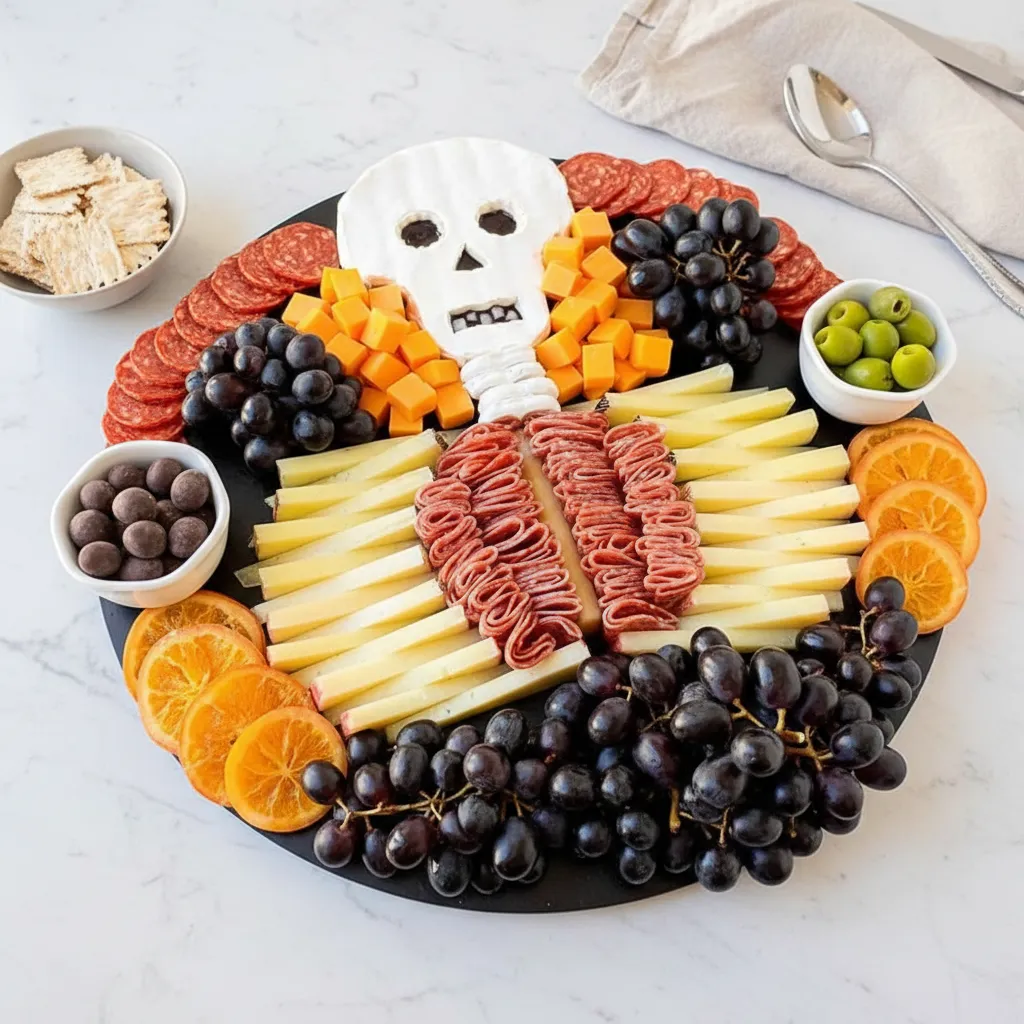
When Halloween rolls around, it’s all about creating that perfect spooky atmosphere, and what better way to do that than with food that’s both delicious and a little bit creepy? If you’re looking for a show-stopping centerpiece for your next gathering, look no further. This Easy Skeleton Charcuterie Board for Halloween Parties is the perfect blend of fun, flavor, and festive flair. It’s surprisingly simple to assemble but looks incredibly impressive, making you look like a Halloween party pro.
Forget complicated recipes that take hours. This spooky charcuterie board comes together with just a bit of creative cutting and arranging. Using a variety of cheeses, cured meats, and other tasty snacks, you’ll build an edible skeleton that’s almost too cool to eat. Almost. It’s a fantastic project to get the kids involved with, and it’s a guaranteed conversation starter among your guests. Let’s get building!
Jump To:
Why You’ll Love This Recipe
Honestly, what’s not to love about a recipe that’s both a snack and a decoration? This skeleton charcuterie board is a winner for so many reasons. First off, it’s incredibly versatile. You can easily swap out ingredients based on what you have or what your guests prefer. Don’t like olives? Use some dark chocolate almonds instead. The core concept is the skeleton shape, and the rest is up to your imagination.
Another huge plus is how visually stunning it is. We all eat with our eyes first, and this Halloween food board is a feast for the eyes before it even hits your plate. It brings a playful, spooky vibe to any party spread without requiring any actual cooking or baking. It’s all about assembly, which means less time in a hot kitchen and more time enjoying the party. Plus, it’s a balanced board with a mix of savory, sweet, and salty bites, so there’s truly something for everyone to enjoy.
Ingredients
Putting together this festive board is all about gathering the right shapes and colors. Here’s what you’ll need to bring your spooky skeleton to life. Remember to check that your cheeses use a plant or microbial source for rennet if that’s a dietary consideration for you.
- 1 (13-ounce) wheel of Brie
- 2 ounces blueberry jam
- 4 yogurt-covered pretzels
- String cheese
- 16 ounces young Manchego, sliced evenly in triangles
- 12 ounces Italian dry cured beef sausage
- Cured beef sausage (pre-sliced, such as beef Calabrese)
- Castelvetrano olives
- Chocolate-covered cranberries
- 12 ounces cubed mild cheddar
- 30 ounces dark purple grapes
- 8 dried orange slices
Step-By-Step Instructions
Ready to build your masterpiece? Just follow these simple steps to create a spooky and delicious skeleton charcuterie board.
Step 1: Shape the Skull
Let’s start with the head of our operation! Take your round wheel of Brie and get ready to do a little carving. First, cut small wedges out of the sides to give it a skull-like shape, almost like a mushroom cap. Then, carefully carve out two round holes for the eyes, a small triangle for the nose, and a larger square for the mouth. To make room for a spooky filling, slice the Brie horizontally through the middle, creating a top and bottom piece. Finally, round out any sharp edges to perfect your skull shape.
Step 2: Add Blueberry Jam and Teeth
Now for the gory-but-delicious part! Separate the top and bottom layers of your Brie skull. Spread the blueberry jam generously on the bottom layer. This will create a dark, eerie effect when you place the top back on. Before you do, let’s give our skull some teeth. Cut a small piece of Manchego cheese into tiny squares and arrange them along the bottom edge of the mouth opening. They’ll look just like little teeth!
Step 3: Build the Skeleton’s Body
With the skull complete, place it at the top of your large serving board or platter. It’s time to build the rest of the body. Directly below the skull, stand up the four yogurt-covered pretzels to form the neck. Next, lay down pieces of string cheese end-to-end below the pretzels to create the spine. For the rib cage, arrange the triangular Manchego slices in a crescent shape on both sides of the string cheese spine. Make sure to alternate the direction of the triangles to create a realistic rib effect.
Step 4: Fold in the Meats and Add Accoutrements
A skeleton needs some substance! Fold the Italian dry cured beef sausage into quarters and tuck them into the spaces between the Manchego ribs and the string cheese spine. This adds great color and texture. Line the top of the board, around the skull, with the pre-sliced cured beef sausage. Next, fill two small bowls or ramekins—one with Castelvetrano olives and the other with chocolate-covered cranberries—and place them on either side of the board for balance.
Step 5: Fill Out the Rest of the Board
The final step is to fill in all the empty spaces to make your Halloween food board look full and abundant. Scatter the cubed cheddar cheese, dark purple grapes, and dried orange slices around the skeleton. Don’t be afraid to pile them high! The contrast of colors and shapes will make your board look even more spectacular. And just like that, your Easy Skeleton Charcuterie Board for Halloween Parties is ready to wow your guests!
How To Store Leftovers
If you somehow end up with leftovers (which is rare!), storing them is pretty straightforward. Disassemble the board and store each component separately in airtight containers in the refrigerator. The cheeses and meats should be wrapped tightly in plastic wrap or parchment paper before being placed in containers. They’ll generally stay fresh for a few days. The crackers, pretzels, and dried fruit should be stored at room temperature in their own airtight containers to keep them from getting soggy.
Conclusion
And there you have it—a frightfully fun and delicious Easy Skeleton Charcuterie Board for Halloween Parties! This recipe proves that you don’t need to be a professional chef to create something memorable and impressive for your holiday celebration. With just a few simple ingredients and a bit of creativity, you can assemble a spooky charcuterie board that will be the talk of the town. It’s the perfect, low-stress way to add a festive touch to your table. So go ahead, give it a try and have a wonderfully spooky time!
FAQ
Can I prepare this board ahead of time?
Absolutely! You can do a lot of the prep work in advance. You can slice the cheeses, wash the grapes, and portion out the smaller items into containers a day ahead. However, I’d recommend assembling the full board just a few hours before your party to ensure everything stays fresh, especially the meats and Brie. You can cover it loosely with plastic wrap and keep it in the fridge until you’re ready to serve.
What if I can’t find some of the ingredients?
No problem at all! Charcuterie boards are all about customization. If you can’t find Manchego, another firm, pale cheese like Provolone or Havarti would work for the ribs. Any pre-sliced salami can stand in for the Calabrese. For the jam, raspberry or fig would also create a great dark, spooky effect inside the Brie skull. The key is to maintain the variety of colors, textures, and flavors.
How do I make this board kid-friendly?
This board is already pretty kid-friendly, but you can definitely make some swaps to appeal even more to little ones. You could use mini mozzarella balls instead of olives, add some fun Halloween-themed gummy candies, or use milder meats. The act of building the skeleton itself is a super fun activity for kids to help with, making it an even more engaging treat for them.