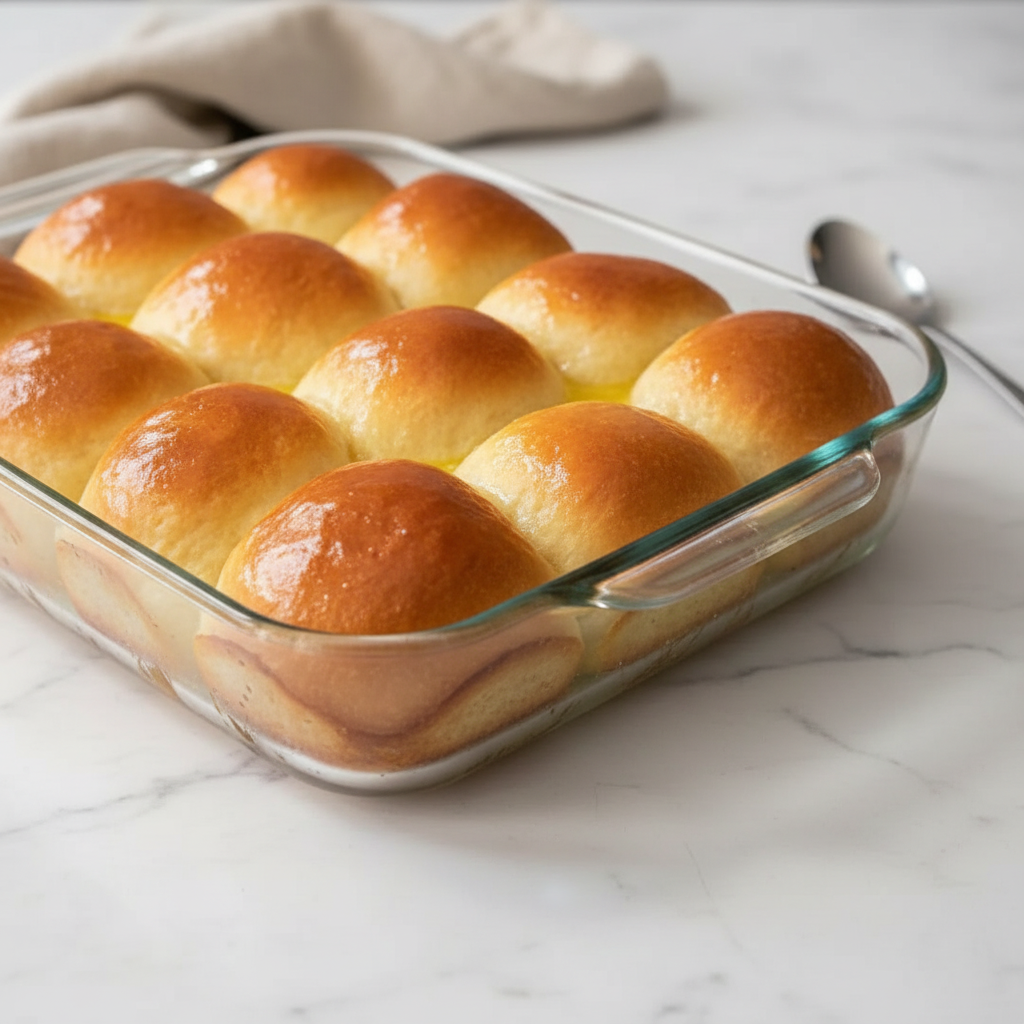
Have you ever found yourself dreaming about those unbelievably soft, warm, and buttery rolls from the school cafeteria? It’s funny how some memories stick with you, especially the delicious ones. This Grandma’s Old-Fashioned School Yeast Rolls Recipe is here to bring that wonderful memory right into your kitchen.
This isn’t just any recipe. It’s a journey back to simpler times, packed with comforting flavor. These are the kind of Homemade Bread Rolls that make your whole house smell incredible. They’re perfect for family gatherings, holiday dinners, or just a simple weeknight meal. Get ready to bake a batch of pure happiness.
Jump To:
Why You’ll Love This Recipe
So what makes this School Yeast Rolls Recipe so special? Honestly, it’s the simplicity and the amazing results. You don’t need to be a professional baker to get these right. They come out perfect every time.
First off, the texture is just heavenly. They are incredibly soft and fluffy on the inside with a beautiful golden brown top. Each bite feels like a warm hug. It’s the ultimate comfort food.
They are also wonderfully versatile. You can serve them as a side with almost any meal. They are a star player in many Kid Friendly Dinners. Just imagine them next to a hearty soup or a Sunday roast. They are also amazing on their own with a little butter.
Another great thing is the nostalgia factor. Baking these rolls brings back so many warm feelings. It’s a wonderful way to connect with past memories while creating new ones with your own family.
And let’s talk about the flavor. The hint of sweetness combined with the rich, buttery taste is just perfect. This Yeast Dinner Rolls Recipe has a classic flavor profile that everyone loves.
Ingredients
Here’s what you’ll need to get started. The ingredients are simple and you probably have most of them in your pantry already. No fancy items are required for these amazing rolls.
- 2 ½ cups warm water
- 1 ½ tablespoons active dry yeast
- ½ cup white sugar
- 1 tablespoon salt
- ¾ cup vegetable shortening or softened butter
- 7 cups all purpose flour, divided
- ½ cup melted butter, for brushing
Step By Step Instructions
Ready to bake? Let’s walk through the process together. Don’t worry, making this Grandma’s Old-Fashioned School Yeast Rolls Recipe is easier than you think. Just follow these simple steps.
Step 1: Activate The Yeast
First things first, we need to wake up the yeast. This is a crucial step for getting those fluffy rolls. Grab the bowl of your stand mixer and fit it with the dough hook.
Pour the warm water into the bowl. Make sure the water is warm, not hot. If it’s too hot, it will harm the yeast. Sprinkle the active dry yeast over the water.
Next, stir in the sugar and salt. Give it a gentle mix and then let it sit. You’ll want to wait about five to ten minutes. You’ll know it’s ready when the mixture becomes foamy and bubbly. That means the yeast is alive and happy.
Step 2: Start The Dough
Now that the yeast is activated, it’s time to start building our dough. Add three cups of the all purpose flour to the yeast mixture. Then, add the vegetable shortening or softened butter.
Turn your mixer on to a low speed. Let it mix until everything is well combined. The mixture should look like a thick, smooth batter, almost like pancake batter. This is the base for our delicious rolls.
Step 3: First Rise
This step is where the magic happens. Remove the bowl from the mixer. Cover it with some plastic wrap and then a clean towel. This will help trap the warmth and moisture.
Find a warm, draft free spot for the dough to rise. A great trick is to place the bowl over a pot of hot water. Just make sure the bottom of the bowl isn’t touching the water directly.
Let the dough rise until it has doubled in size. This usually takes about 45 to 60 minutes. Be patient here. A good rise is key for light and airy Homemade Bread Rolls.
Step 4: Add Remaining Flour
Once the dough has doubled, it’s time to add the rest of the flour. Place the bowl back onto the stand mixer. With the mixer on low, gradually add the remaining four cups of flour.
Keep mixing until the dough comes together. It should be smooth, soft, and elastic. If you find the dough is a bit too sticky, you can add a little more flour. Add up to one extra cup, just a small amount at a time, until the dough is easy to handle.
Step 5: Prepare The Pans
Get your baking pans ready. For this Yeast Dinner Rolls Recipe, you will need two 9 by 13 inch glass baking pans. Grease them generously with a little bit of shortening or butter. This prevents the rolls from sticking and helps them get a nice golden bottom.
Step 6: Shape The Rolls
Now for the fun part. Turn the dough out onto a lightly floured surface. Divide the dough into 24 equal pieces. You can use a kitchen scale for precision if you like, but eyeballing it works just fine too.
Take each piece of dough and shape it into a smooth ball. Arrange twelve rolls in each of your prepared pans. They should be close together but not too crowded.
Cover the pans with plastic wrap and a towel again. Let the rolls rise in a warm spot for a second time. Wait until they have doubled in size, which should take about an hour. They will look puffy and ready for the oven.
Step 7: Bake
While the rolls are doing their final rise, preheat your oven to 375 degrees Fahrenheit or 190 degrees Celsius. Having the oven ready is important for a good bake.
Once the rolls are nice and puffy, place them in the preheated oven. Bake for about 25 to 30 minutes. You’re looking for a beautiful, deep golden brown color on top. Your kitchen will smell absolutely amazing.
Step 8: Finish
As soon as you take the rolls out of the oven, it’s time for the final touch. While they are still warm, brush the tops generously with the melted butter. This gives them a lovely shine and an extra layer of delicious buttery flavor.
And that’s it! Your beautiful, homemade School Yeast Rolls Recipe is complete. Let them cool for a few minutes before serving. Enjoy them warm.

How To Store Leftovers
If you happen to have any leftovers, which is rare, storing them is easy. Make sure the rolls have cooled down completely before you store them. This prevents them from becoming soggy.
You can keep them in an airtight container or a resealable plastic bag. They will stay fresh at room temperature for about two to three days. For longer storage, you can freeze them.
To freeze, wrap the cooled rolls tightly in plastic wrap and then place them in a freezer bag. They can be frozen for up to three months. When you’re ready to eat them, just thaw them at room temperature or warm them up in the oven.
Tips
Want to make your rolls even better? Here are a few tips to ensure your Grandma’s Old-Fashioned School Yeast Rolls Recipe comes out perfectly every single time.
Always check the expiration date on your yeast. Old yeast won’t activate properly, which means your rolls won’t rise. It’s a small detail that makes a huge difference.
The temperature of the water is very important. If it’s too hot, it will kill the yeast. If it’s too cold, it won’t activate. A good rule of thumb is to use water that feels comfortably warm to the touch, like a baby’s bath.
Don’t be afraid to add a little extra flour if your dough feels too sticky. The humidity in your kitchen can affect how much flour you need. Just add it a tablespoon at a time until the dough is soft and manageable.
Finding a warm place for the dough to rise can be tricky. Besides the hot water method, you can also use your oven. Turn it on to the lowest setting for a few minutes, then turn it off and place the dough inside with the door cracked open.
For extra rich rolls, you can use whole milk instead of water. This will give them a softer crumb and a slightly richer flavor. This is a great variation for your Yeast Dinner Rolls Recipe.
When shaping the rolls, try to make them as uniform as possible. This helps them bake evenly. A smooth, tight ball shape will give you those picture perfect rolls. These make great additions to Kid Friendly Dinners.
Conclusion
There you have it. A simple, delicious, and nostalgic recipe for the best homemade rolls you’ll ever make. This Grandma’s Old-Fashioned School Yeast Rolls Recipe is more than just food. It’s a way to create wonderful memories with your loved ones.
Baking these Homemade Bread Rolls is a rewarding experience from start to finish. The process is enjoyable, and the result is a batch of incredibly soft, buttery rolls that everyone will love. So go ahead, give it a try. You’ll be so glad you did.
FAQ
Can I Use Instant Yeast Instead of Active Dry Yeast?
Yes, you can. If you’re using instant yeast, you can skip the activation step. Simply mix it in with the flour and other dry ingredients. The rise times might be a little shorter, so keep an eye on your dough.
Can I Make This Dough Ahead of Time?
Absolutely. You can prepare the dough through the first rise. After that, you can cover it and refrigerate it for up to 24 hours. When you’re ready to bake, let the dough come to room temperature, then shape the rolls and let them rise again before baking.
Why Didn’t My Rolls Rise?
There are a few common reasons. Your yeast might be old or expired. The water might have been too hot, which kills the yeast. Or, the spot where you let the dough rise might have been too cold. Make sure to use fresh yeast and a warm, draft free environment.
Grandma’s Old-Fashioned School Yeast Rolls
Experience a comforting journey back to simpler times with these unbelievably soft, warm, and buttery homemade yeast rolls. This classic recipe delivers fluffy, golden-brown rolls that will make your whole house smell incredible, perfect for any family meal.
Ingredients
Instructions
- Activate the yeast: In a large bowl, dissolve yeast, sugar, and salt in warm water. Let stand for 5-10 minutes until foamy.
- Mix and rise: Stir in 3 cups of flour and the softened shortening. Cover and let rise in a warm place for about 1 hour, until doubled.
- Shape and second rise: Gradually mix in the remaining 4 cups of flour. Divide the dough into 24 pieces, shape into balls, and place in two greased 9×13 inch pans. Cover and let rise for another hour.
- Bake and serve: Bake at 375°F (190°C) for 25-30 minutes until golden brown. Brush with melted butter immediately and serve warm.
Notes
Ensure your yeast is fresh and not expired for the best rise.
The water should be warm to the touch, not hot, to properly activate the yeast without harming it.
For richer, softer rolls, you can substitute whole milk for the water in the recipe.
Nutrition (per roll)
Calories
Sugar
Fat
Carbs