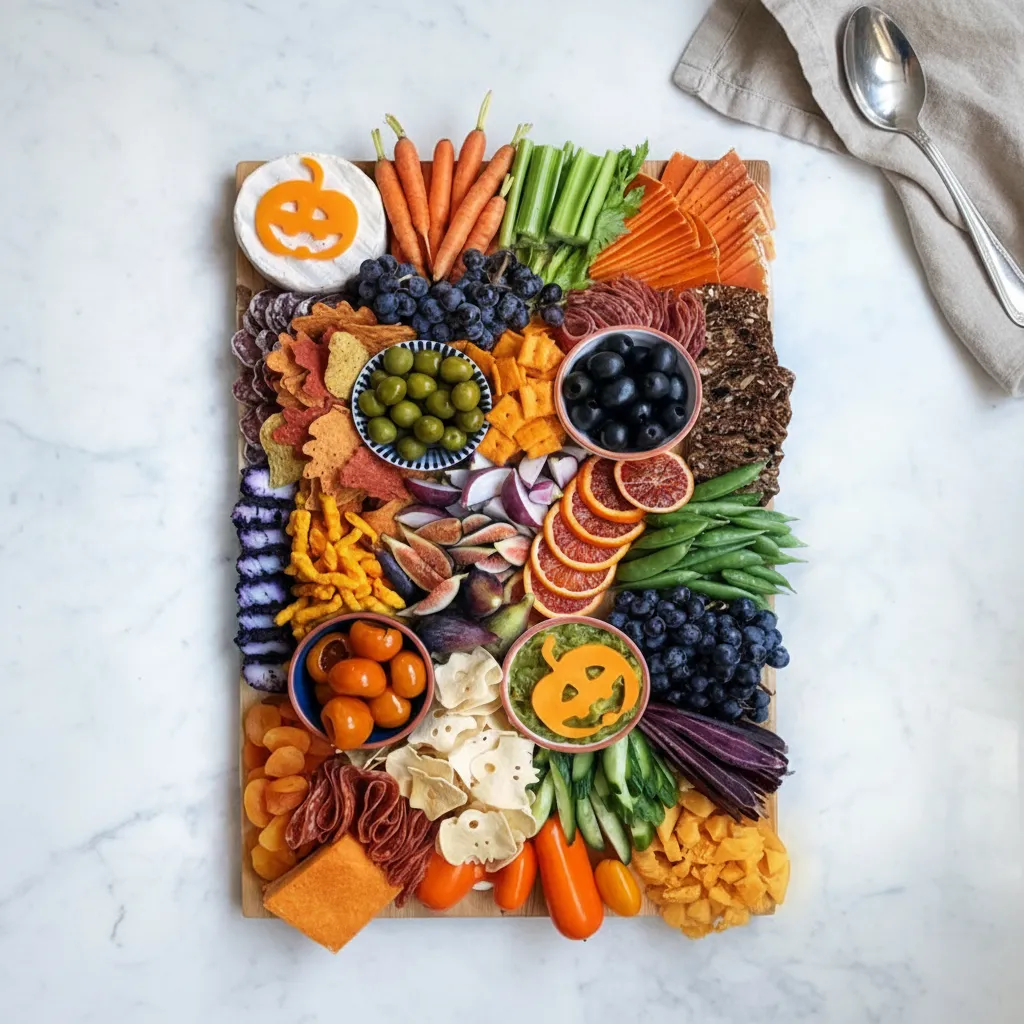
When Halloween rolls around, it’s all about the spooky vibes, creative costumes, and, of course, the fun food! Forget the standard bowl of candy for a minute. What if you could create something that’s both deliciously grown-up and frightfully fun for the kids? That’s where the magic of a Halloween Cheese Board comes in. This isn’t just any old appetizer; it’s a centerpiece, a conversation starter, and a fantastic way to offer a variety of tasty bites before the main event or during a festive party. It’s the perfect way to get creative with food.
Crafting one of the Best Halloween Cheese Board & Food Platter Ideas is easier than you might think. It’s all about combining classic charcuterie elements with a spooky twist. Think cheeses cut into ghostly shapes, meats arranged like flowing capes, and a color palette of oranges, blacks, purples, and greens. This guide will walk you through creating a visually stunning and absolutely delicious Spooky Charcuterie Board that will have all your ghouls and goblins coming back for more. Let’s get building!
Jump To:
Why You’ll Love This Recipe
Honestly, what’s not to love about a board piled high with goodies? But this Halloween Food Board is extra special. First off, it’s incredibly versatile. You can follow this recipe to a T, or you can use it as a jumping-off point and swap in your own favorite cheeses, meats, and snacks. It’s a fantastic way to clean out the pantry and fridge, using up those last few crackers or that handful of olives.
Another great thing is how creative you get to be. It’s like edible art! You don’t need to be a professional food stylist to make this look amazing. With a few simple cookie cutters and some clever placement, you can create a board that looks like it took hours, but really only takes a few minutes to assemble. It’s a fun project for you, and it can even be a great way to get the kids involved in the kitchen. Plus, it caters to everyone’s tastes—there’s something savory, something sweet, something crunchy, and something fresh for every guest to enjoy.
Ingredients
Here’s what you’ll need to build a spectacular Halloween Cheese Board. Feel free to mix and match based on what you have and what you love!
For the Meats & Cheeses
- Cured Meats: 12 ounces of various cured beef and turkey meats, like dried beef slices, turkey salami, or beef prosciutto.
- Brie Cheese: 1 6-ounce wheel. Make sure the rennet is from a plant or microbial source if you need it to be vegetarian-friendly.
- Aged Cheddar or Gouda: A good-sized wedge. Again, check for plant or microbial-based rennet if needed.
- Blueberry Goat Cheese: 1 4-ounce log. The dark color is perfect for the theme!
- White Cheese Slices: 4 slices of mozzarella or provolone for making ghosts.
- Orange Cheese Slices: 4 slices of Cheddar for jack o’lantern cutouts.
For the Crunchy Bits
- Crackers & Chips: A fun assortment! Try fig and olive crackers, plain white crackers, blue corn tortilla chips, autumn leaf-shaped tortilla chips, ghost- and bat-shaped potato chips, cheese-flavored corn puffs, and square cheese crackers.
For the Veggies, Fruits & Dips
- Olives and Pickles: 1 cup of black olives and 1 cup of green olives.
- Dips and Spreads: Guacamole works great for a spooky green color.
- Vegetable Crudités: Carrots, orange mini bell peppers, green bell pepper, celery, Persian cucumber, and purple “ninja” radish for color and crunch.
- Fresh Fruit: Blood orange, tangerine, persimmon, green grapes, black/purple grapes, figs, blackberries, and blueberries.
- Dried Fruit: Dried apricots, dried mango, and dried persimmon add a nice chewy texture.
For the Spooky Sweets
- Candy and Sweets: Chocolate pieces, fruit-based hard candies, and soft chew candies. Just be sure to check labels for any ingredients you need to avoid, like gelatin or alcohol.
Step-By-Step Instructions
Ready to assemble your masterpiece? It’s simpler than you think. Let’s break it down.
Step 1: Prepare the Cheeses
First things first, let’s get those cheeses ready for their close-up. Grab your aged Cheddar or Gouda and a sharp knife. Slice it into thin, rustic triangles. For the blueberry goat cheese, using a cheese harp or even a piece of unflavored dental floss will give you clean, perfect rounds. Now for the fun part! Take your ghost-shaped cookie cutter and press it into the mozzarella or provolone slices to create some friendly phantoms. Do the same with the jack o’lantern cutter and the orange Cheddar slices. Set all your spooky cheese creations aside for a moment.
Step 2: Assemble the Board
This is where the magic happens. Start by placing your larger items to create anchor points on your charcuterie board. Put the wedge of aged Cheddar or Gouda in one corner. You can even use a small knife or fork to crumble off a few pieces for a more rustic look. Place the wheel of Brie and the rounds of blueberry goat cheese near the edges of the board. Next, start arranging your cured meats. You can fold them into rosettes, create a flowing “river” down the middle of the board, or just fan them out around the cheeses. Once the main players are in place, begin filling in all the empty spaces with the rest of your ingredients—crackers, fruits, veggies, olives, and candies. Think about color and texture, placing contrasting items next to each other to make the board pop.
Step 3: Garnish and Serve
Time for the final touches! Carefully place your ghost and jack o’lantern cheese cutouts on top of other ingredients where they’ll be visible. Maybe a ghost can peek out from behind a pile of blackberries, or a jack o’lantern can sit on top of the Brie wheel. You can also add some of those ghost- and bat-shaped potato chips for extra spooky flair. Once everything is arranged just how you like it, your Spooky Charcuterie Board is ready to be unveiled. Serve it immediately and watch your guests’ eyes light up!

How To Store Leftovers
If you somehow end up with leftovers from your amazing Halloween Food Board, storing them is pretty simple. The best way to do it is to disassemble the board. Wrap the different types of cheeses separately in wax paper or plastic wrap and store them in the fridge. Meats should also be wrapped and refrigerated. Crackers and chips can go back into their original packaging or an airtight container to keep them from getting stale. As for the fresh fruits and veggies, pop them into airtight containers and keep them in the fridge. This way, everything stays fresh, and you can enjoy the delicious components for a few more days.
Conclusion
There you have it—a simple, fun, and totally impressive way to celebrate the spooky season! Creating one of the Best Halloween Cheese Board & Food Platter Ideas is all about having fun with your food. It’s a flexible recipe that invites you to play with flavors, colors, and shapes. Whether you’re hosting a big Halloween bash or just want a festive snack for a horror movie night, this board is a guaranteed hit. So go ahead, get creative, and build a delicious and memorable Halloween Cheese Board that will be the talk of the party.
FAQ
Can I Make This Board Ahead of Time?
You can definitely do some prep work in advance! You can wash and chop your fruits and veggies a day ahead and store them in the fridge. The cheeses can also be sliced and cut into shapes beforehand. Just keep everything well-wrapped and separated. I would recommend assembling the board right before you plan to serve it to keep everything, especially the crackers and chips, fresh and crisp.
What if I Have Dietary Restrictions?
No problem at all! This board is super easy to customize. For a gluten-free version, simply use your favorite gluten-free crackers and chips. For a vegetarian board, you can omit the cured meats and add more plant-based goodies like hummus, roasted red pepper dip, spiced nuts, or even some vegetarian deli slices. Just be sure to check that your cheeses are made with vegetarian-friendly rennet.
What Kind of Board Should I Use?
You can use any large platter, cutting board, or tray you have on hand. A wooden or slate board gives it a nice, rustic look, but a simple ceramic platter works just as well. The key is to have enough surface area to spread everything out so it doesn’t look too crowded. If you don’t have one large board, you can even use a few smaller platters grouped together.