Have you ever been on the hunt for that one perfect appetizer? You know the one. It has to be a total crowd pleaser, simple to make, and delicious whether it is served warm or at room temperature. It is a tall order, but I think I have the perfect answer for you.
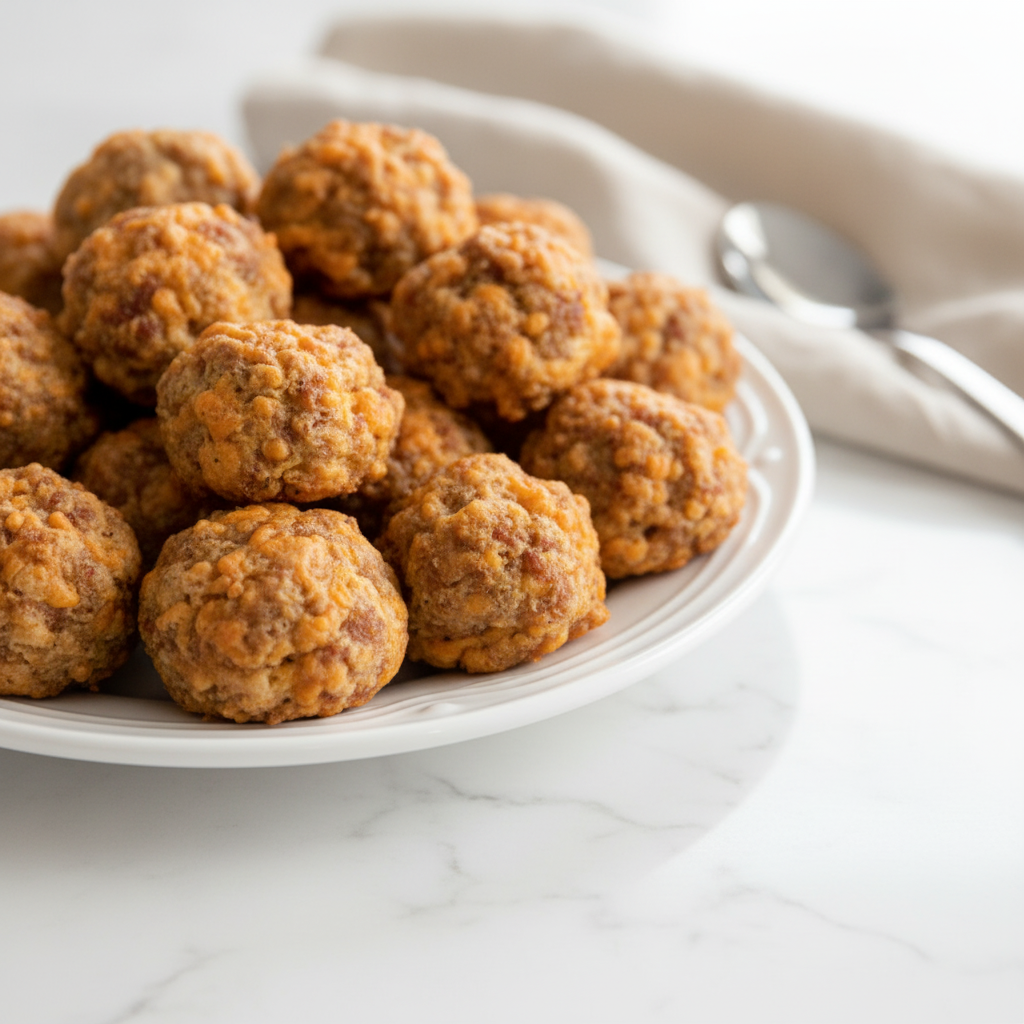
Let me introduce you to these incredible homemade Cheese Sausage Balls. This is a classic recipe, reminiscent of what you might find at a family gathering in the south. We are making these amazing Sausage Balls Without Bisquick, giving you full control over the ingredients and the final, amazing flavor. They are savory, cheesy, and just so satisfying.
Jump To:
Why You’ll Love This Recipe
Honestly, what is not to love about savory sausage and sharp cheddar cheese all wrapped up in a tender, bite sized ball? These little bites are a staple for a reason. They disappear from the plate in minutes at any party I bring them to.
One of the best things about this recipe is its sheer simplicity. You do not need any special equipment or fancy ingredients. Everything comes together in one bowl, making cleanup an absolute breeze. This makes it a perfect recipe for beginner cooks or when you just need something easy.
These sausage balls are also incredibly versatile. Are they a breakfast food? Yes. Are they a fantastic party appetizer? Absolutely. Are they a great afternoon snack? You bet. You can serve them for pretty much any occasion you can think of.
Plus, this recipe is a fantastic make ahead option. You can prep the mixture a day in advance or even freeze a big batch. This is a lifesaver when you are planning for the holidays or a big get together. Having these ready to pop in the oven is a game changer.
Finally, this is a recipe that brings people together. It is a comforting, classic snack that feels both nostalgic and fresh. Making a batch of these Southern Sausage Balls feels like sharing a little bit of warmth and joy. They are just pure, simple comfort food.
Ingredients
The beauty of these Cheese Sausage Balls lies in the simplicity of the ingredients. You probably have most of what you need in your pantry and refrigerator right now. Let’s talk about what goes into them.
We are building the base with all purpose flour, salt, pepper, onion powder, and baking powder. This simple combination creates the structure and adds a subtle layer of flavor that complements the sausage and cheese perfectly. It is the foundation for our delicious Sausage Balls Without Bisquick.
For the cheese, sharp cheddar is the way to go. It has a robust flavor that can stand up to the sausage. I always recommend grating your own cheese from a block. Pre shredded cheese often has anti caking agents that can make your sausage balls a bit dry and prevent the cheese from melting as smoothly.
The recipe calls for ground chicken or turkey sausage, seasoned to taste like a classic pork sausage. This is a great lighter option. Of course, you can absolutely use your favorite pound of ground pork sausage if you prefer. A breakfast sausage with sage is a classic choice for Southern Sausage Balls.
To bring it all together, we use melted unsalted butter and a bit of milk. The butter adds richness and flavor, while the milk provides the necessary moisture to form a cohesive, easy to handle dough. It ensures every bite is tender, not dry.
- 1¼ cups all purpose flour
- ½ teaspoon salt
- ½ teaspoon black pepper
- ½ teaspoon onion powder
- 1½ teaspoons baking powder
- 2 cups grated sharp cheddar cheese
- 1 pound ground chicken or turkey sausage (seasoned with a pinch of sage, garlic powder, and paprika)
- 3 tablespoons unsalted butter, melted
- ¼ cup milk
Step By Step Instructions
Ready to make the best Cheese Sausage Balls ever? Let’s walk through it step by step. It is super easy, I promise. Just follow along and you will have a perfect batch in no time.
Step 1: Preheat And Prep
First things first, let’s get your oven ready. Preheat it to 400 degrees F or 200 degrees C. Getting your oven nice and hot from the start ensures that the sausage balls cook evenly and get that beautiful golden brown color.
While the oven is preheating, grab a baking sheet. You will want to lightly grease it. You can use a little butter, some cooking spray, or line it with parchment paper for the easiest cleanup imaginable. This step prevents the bottoms from sticking and burning.
Step 2: Combine Dry Ingredients
Now, grab a large mixing bowl. You want one with plenty of room to work in. Into the bowl, add your flour, salt, pepper, onion powder, and baking powder. Give these ingredients a good whisk. This is an important little step. It makes sure the salt and baking powder are evenly distributed, which means every single sausage ball will be perfectly seasoned and will rise beautifully.
Step 3: Add The Cheese
Next up is the cheese. Add your freshly grated sharp cheddar cheese to the bowl with the flour mixture. Use a spoon or your hands to toss it all together. You want to get every single shred of cheese coated in flour. This little trick prevents the cheese from clumping up when you add the other ingredients and helps create a wonderful texture in the final product.
Step 4: Mix In The Wet Ingredients
It is time for the main event. Add your ground sausage, melted butter, and milk to the bowl. Now, you can try to use a spoon, but I am going to be honest with you. The best tools for this job are your own two hands. Do not be afraid to get in there and mix everything together. You want to work the mixture until it is just combined. Be careful not to overwork it, as that can make the sausage balls tough.
You are looking for a mixture that holds together well but is not overly sticky or wet. If it feels too dry, you can add another splash of milk, just a teaspoon at a time. If it feels too sticky, a little sprinkle of flour can help.
Step 5: Form The Balls
Now for the fun part. It is time to form your Cheese Sausage Balls. Scoop up portions of the mixture and roll them into 1 inch balls. A small cookie scoop is fantastic for this because it keeps them all uniform in size, which means they will all bake at the same rate. If you do not have one, a regular spoon works just fine.
Place the formed balls on your prepared baking sheet. You can place them fairly close together, but try not to let them touch. Giving them a little space helps the hot air circulate, ensuring they get crispy all the way around.
Step 6: Bake To Golden Perfection
Place the baking sheet in your preheated oven. Let them bake for about 20 to 25 minutes. You will know they are done when they are a beautiful golden brown color and are cooked all the way through. The wonderful smell of sausage and cheese will fill your entire kitchen. It is one of the best parts of making these.
Step 7: Serve And Enjoy
Once they are done, carefully remove the baking sheet from the oven. Let the sausage balls cool for just a few minutes on the pan before transferring them to a serving platter. They are absolutely delicious served warm, either on their own or with your favorite dipping sauce. Enjoy every single bite.
How To Store Leftovers
If you happen to have any leftover Cheese Sausage Balls, which is not always a guarantee, storing them is very easy. First, make sure they have cooled down completely to room temperature. Storing them while still warm can create condensation, which will make them soggy.
Once cooled, place the leftovers in an airtight container. You can keep them in the refrigerator for up to four days. When you are ready to eat them, you can enjoy them cold or reheat them. The best way to reheat them is in the oven or an air fryer at 350 degrees F for just a few minutes until they are warmed through and crispy again. The microwave works in a pinch, but they will be much softer.
These sausage balls also freeze beautifully. You can freeze them either cooked or uncooked. To freeze uncooked balls, place them on a baking sheet in a single layer and freeze until solid. Then, transfer them to a freezer safe bag or container. They will last for up to three months. You can bake them straight from frozen, just add about 5 to 10 extra minutes to the baking time.
To freeze cooked sausage balls, follow the same method. Let them cool completely, flash freeze them on a baking sheet, and then store them in a freezer bag. This is a perfect way to have a quick snack or appetizer ready to go at a moment’s notice.
Tips
Want to make sure your Cheese Sausage Balls are absolutely perfect every single time? Here are a few extra tips that can help you achieve sausage ball greatness.
First, as I mentioned earlier, please grate your own cheese. It truly makes a world of difference in the texture and meltiness of your final product. It is a small step that delivers a big reward.
Be very careful not to overmix the dough. Once the ingredients are just combined, stop mixing. Overworking the mixture can develop the gluten in the flour too much, leading to tough, dense sausage balls instead of light and tender ones.
Using ingredients that are at room temperature can also help. This is especially true for the sausage and milk. It allows the mixture to come together more easily and evenly without having to overmix it.
A small cookie scoop is your best friend for this recipe. It not only makes the process faster and less messy, but it also ensures that all your sausage balls are the same size. This is key for even baking.
Finally, feel free to get creative with dipping sauces. While these are amazing on their own, a good sauce can take them to the next level. Think ranch dressing, honey mustard, barbecue sauce, or even a spicy aioli. The options are endless.
Conclusion
There you have it. A simple, straightforward recipe for making the most amazing Cheese Sausage Balls right in your own kitchen. This is proof that you do not need a box mix to create a truly delicious and classic appetizer. With just a handful of simple ingredients and a little bit of time, you can whip up a batch of these savory bites that everyone will love.
Whether you are making them for a holiday party, a game day gathering, or just a simple family breakfast, these sausage balls are sure to be a huge hit. They are the perfect combination of comforting, savory, and cheesy. I hope you give this recipe a try and that it becomes a new favorite for you and your family.
FAQ
Can I Use A Different Type Of Sausage?
Absolutely. This recipe is very flexible. While the instructions suggest seasoned chicken or turkey sausage, you can easily substitute it with one pound of your favorite ground pork sausage. Hot breakfast sausage will add a nice kick, while a mild or sage sausage will give you that classic Southern Sausage Balls flavor.
Can I Make These Gluten Free?
Yes, you can. To make these gluten free, simply swap the all purpose flour for your favorite 1 to 1 gluten free baking flour blend. Look for one that contains xanthan gum. The texture might be slightly different, but they will still be incredibly delicious.
Why Are My Sausage Balls Dry?
There are a few reasons why your sausage balls might turn out dry. The most common culprit is overbaking, so be sure to pull them out of the oven once they are golden brown. Using a leaner sausage can also contribute to dryness, as can overmixing the dough. Also, remember to use freshly grated cheese for the best moisture and melt.
Can I Prepare The Dough Ahead Of Time?
Yes, this is a great make ahead recipe. You can prepare the mixture, cover the bowl tightly with plastic wrap, and store it in the refrigerator for up to 24 hours before you plan to bake them. When you are ready, just form the balls and bake as directed.
What Are The Best Dipping Sauces For These?
The best dipping sauce is really up to you. Some popular choices that pair wonderfully with these Cheese Sausage Balls include creamy ranch dressing, zesty honey mustard, classic barbecue sauce, or even a simple grape jelly and chili sauce mixture for a sweet and savory combination. A spicy mayo or aioli is also a fantastic option.
Homemade Cheese Sausage Balls
These homemade Cheese Sausage Balls are a classic, savory appetizer perfect for any gathering. Made without Bisquick, they’re simple to whip up, incredibly cheesy, and delicious served warm or at room temperature. A true crowd-pleaser!
Ingredients
Instructions
- Preheat your oven to 400°F (200°C). Lightly grease a baking sheet or line it with parchment paper for easy cleanup.
- In a large mixing bowl, whisk together the flour, salt, pepper, onion powder, and baking powder. This ensures everything is evenly distributed.
- Add the freshly grated sharp cheddar cheese to the flour mixture and toss with your hands to coat the cheese shreds completely.
- Add the ground sausage, melted butter, and milk to the bowl. Use your hands to mix everything together until it is just combined. Be careful not to overwork the mixture.
- Scoop and roll the mixture into uniform 1-inch balls. A small cookie scoop is great for keeping them all the same size for even baking.
- Arrange the sausage balls on your prepared baking sheet. Bake for 20 to 25 minutes, or until they are a beautiful golden brown and cooked all the way through.
- Let the sausage balls cool for a few minutes on the pan before transferring them to a serving platter. Enjoy them warm on their own or with a favorite dipping sauce!
Notes
Cheese: For the best texture and melt, always grate your own cheese from a block. Pre-shredded cheese contains anti-caking agents that can make the sausage balls dry.
Mixing: Be careful not to overmix the dough. Mix only until the ingredients are just combined to keep the sausage balls tender and light.
Serving: These are wonderful with a variety of dipping sauces. Try them with ranch, honey mustard, BBQ sauce, or a spicy aioli.
Nutrition (per 3 balls)
Calories
Sugar
Fat
Carbs


