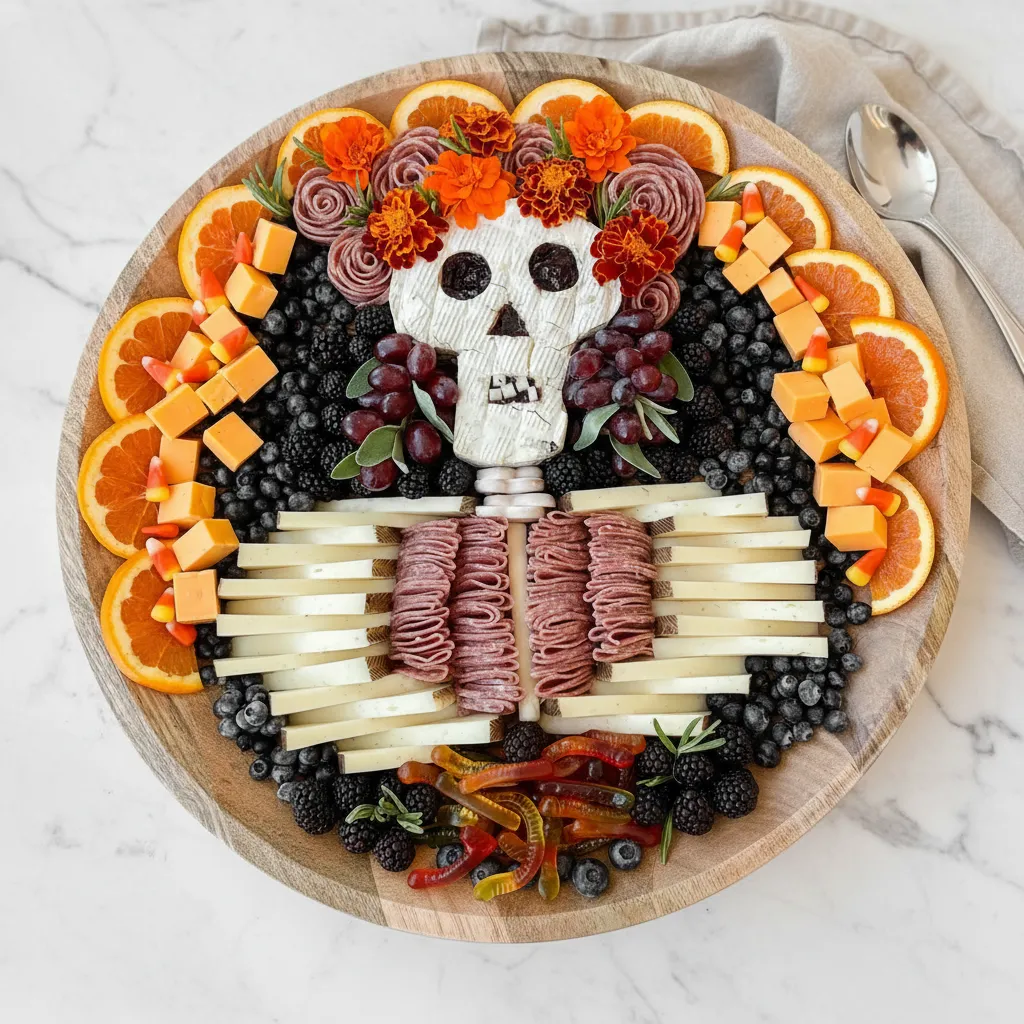
Are you looking for a show-stopping centerpiece for your next Halloween party? Something that’s both delicious and delightfully creepy? Look no further! This guide to creating Spooktacular Halloween Charcuterie Board Recipes will walk you through crafting a memorable and tasty skeleton-themed board that will have all your guests talking. It’s a fun, edible art project that’s way easier to assemble than it looks.
This isn’t just any old cheese platter; it’s a full-on Halloween Food Board experience. By combining savory cheeses, cured meats, sweet treats, and fresh fruits, you can build a festive skeleton that’s almost too cool to eat. Almost! Let’s get started on this amazing Spooky Charcuterie Board that will be the star of your celebration.
Jump To:
Why You’ll Love This Recipe
Honestly, what’s not to love about a recipe that doubles as party decor? This Halloween Cheese Board is a total winner because it’s incredibly customizable. You can swap out ingredients based on what you have, what you love, or what’s on sale. It’s also a fantastic project to get the kids involved in—they’ll have a blast helping you build the skeleton and arrange all the goodies.
Another great thing is that it caters to a crowd with different tastes. You’ve got your savory elements with the cheese and meats, sweet bites from the candy and fruit, and a bit of crunch from the pretzels. It’s a balanced, fun, and interactive way to feed your guests. Plus, it looks absolutely incredible in photos, making your hosting skills look top-notch with minimal cooking required!
Ingredients
Creating this edible masterpiece is all about assembling the right parts. Here’s what you’ll need to build your spooky skeleton friend:
- For the Skeleton Frame: A large, flat serving board or platter to serve as your canvas.
- For the Skeleton Head: 1 round of Brie (ensure the rennet is from a plant or microbial source for a vegetarian-friendly option). A little blackberry jam for a spooky touch.
- For the Body & Bones: A variety of cheeses like triangles of Manchego for the ribs, a cheese stick for the spine, and cubes of orange cheddar cheese (again, check for plant or microbial-based rennets if needed).
- For the Meaty Details: Cured beef or turkey sausage, shaped into “roses” for a flower crown and folded into triangles for the body.
- For the Guts & Goodies: Yogurt-covered pretzels for the neck, fruit-based hard candies, and fruit chew candies (check for no impermissible gelatin) for a colorful, creepy gut pile.
- For Fruity Accents: Sliced oranges to create a halo effect, purple grapes for spooky earrings, and a mix of fresh blueberries and blackberries to fill in any empty spaces.
- For Garnishes: A few sprigs of fresh herbs like sage and rosemary to add a final, elegant touch.
Step-By-Step Instructions
Ready to bring your skeleton to life? Follow these simple steps to assemble your Spooktacular Halloween Charcuterie Board Recipes.
Step 1: Prepare the Board
Let’s set the stage! Before you even think about the skeleton, it’s best to arrange most of your goodies around the edges and in the spaces where the skeleton won’t be. This is your chance to get creative. Place the folded cured meats, cheddar cubes, fruits, and candies around the board. Think about creating visual interest with different colors and textures. This makes the board look full and abundant from the start.
Step 2: Create the Brie Skull
This is the star of the show! To make the skull easier to carve, pop your round of Brie in the freezer for about 30 minutes. Once it’s chilled and firm, it’s time for some simple surgery. Place it on a cutting board and slice it into a general mushroom shape. Then, carefully trim the edges to give it a more defined skull-like appearance. Don’t worry about perfection; rustic and creepy is what we’re going for!
Step 3: Carve the Skull’s Features
Now, take your shaped Brie and carefully slice it in half horizontally, like you’re splitting a bagel. On one half, use a small knife to carve out two eye sockets, a nose cavity, and a mouth. To add a bit of gory detail, you can spread a thin layer of blackberry jam on the other half of the Brie before putting the two pieces back together. For the teeth, slice a few tiny squares from your Manchego cheese and tuck them into the mouth slit. It’s amazing how a few simple cuts can create such a spooky face!
Step 4: Assemble the Skeleton
Place your finished Brie skull at the top of the board. Now, build the body! Lay down the cheese stick for the spine. Arrange the yogurt pretzels below the skull to form the neck. Use the triangles of Manchego to create the ribcage on either side of the spine. Use the cured sausage roses to make a festive flower crown for your skull. It’s a fun, quirky touch that makes the whole thing feel a bit more whimsical.
Step 5: Add the Finishing Touches
Your main structure is done, so it’s time to fill in the gaps and add the final details. Arrange the sliced oranges around the skull to give it a glowing halo. Place grapes near the skull as earrings. Use the blackberries and blueberries to fill any remaining empty spots on the board, which adds a nice pop of dark color. Finally, tuck a few sprigs of fresh sage or rosemary around the board for an aromatic and elegant finish. Your Spooky Charcuterie Board is ready to impress!
How To Store Leftovers
If you somehow have leftovers from this amazing charcuterie board, storing them is pretty straightforward. Disassemble the board and store each component separately. Cheeses should be wrapped tightly in wax paper or plastic wrap and kept in the refrigerator. Meats should also be wrapped and refrigerated. Fruits and candies can be stored in airtight containers. It’s best to enjoy the leftovers within a day or two for the best freshness and texture.
Conclusion
And there you have it—a guide to creating one of the most fun and festive Spooktacular Halloween Charcuterie Board Recipes you’ll ever make. This edible skeleton is more than just an appetizer; it’s an experience. It’s a creative outlet that results in a delicious, crowd-pleasing centerpiece for your Halloween gathering. So go ahead, give it a try, and get ready to wow your guests with your ghoulishly good creation!
FAQ
Can I Make This Board Ahead of Time?
You can definitely do some prep work in advance! You can slice the cheeses, wash the fruits, and arrange the non-perishable items on the board an hour or two before your party. However, it’s best to carve the Brie and assemble the full skeleton just before serving to keep everything looking fresh and prevent the cheese from getting too soft.
What If I Have Dietary Restrictions?
This board is super easy to adapt! For a vegetarian version, simply omit the cured meats and add more cheeses, nuts, or even some spooky-shaped crackers. For a gluten-free board, ensure your pretzels and any crackers you add are certified gluten-free. Always double-check the labels on your candies and cheeses to suit your specific needs.
Where Can I Find Plant-Based Rennet Cheeses?
Most major grocery stores now carry a wide variety of cheeses made with plant or microbial-based rennet. Look for labels that specify “vegetarian rennet” or “microbial rennet.” Many popular brands like Cabot and Tillamook offer vegetarian-friendly options for cheeses like cheddar, and you can often find vegetarian Brie as well.